Create USB Snow Leopard Installer

This guide will show you how to create an USB Snow Leopard Installer out of a thumb drive. This concept of creating a USB Snow Leopard installer is useful because a lot of portable netbooks do not have any disc drives. This makes it impossible to try and install Mac OS X onto a netbook using a disc. Thankfully, it is possible to create a USB installer.
First of all, you will need a few things.
1. A Mac OS X Snow Leopard retail DVD
2. A 8 Gig USB thumb drive
3. A functioning Mac or Hackintosh
Step 1
Extract the whole Mac OS X DVD
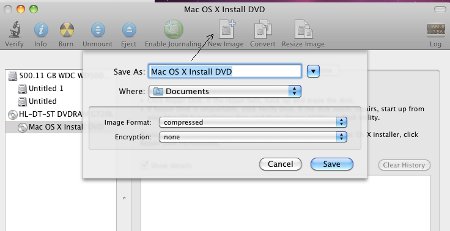
Insert the Mac OS X Snow Leopard DVD into the disc drive and rip the whole disc out into a DMG image. In case you do not know how to extract the DMG into a file. Start the “Disk Utility” program by clicking on “Applications” => “Utilities” => “Disk Utility”. Click on the Snow Leopard DVD followed by the “New Image” icon at the top menu. You can save it anywhere you like as long you are able to find it later.
Step 2
Format and prepare an 8 Gig thumb drive

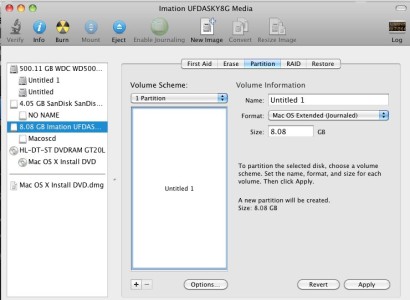
Hook up the thumb drive to your USB port and using Disk Utility again, we shall format and create a single Mac OS Journaled partition on the USB drive. Choose the USB drive and click on the partition tab. Choose a single partition from the volume scheme. Click on “Options” and set as “GUID Partition Table” . Specify a name for the thumb drive so that it can be easily identified later. Once you are done with the settings, click on “Apply”. It will format the thumb drive.
Step 3
Copying the Snow Leopard image over to the thumb drive

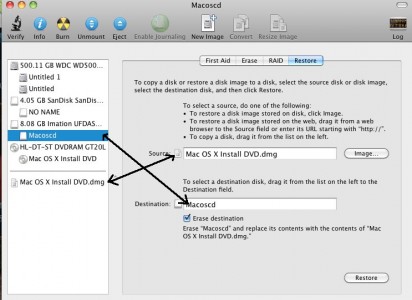
With the thumb drive formatted and still inserted onto the USB drive. Using Disk Utility, Select your formatted thumb drive followed by the “Restore” tab. Drag and drop the DMG file and the thumb drive to their locations respective. Note, that you are supposed to drag the partition, and not the drive or it will not work. Once you are sure that the settings are correct, click on the “Restore” button to start transfer. The whole transferring is going to take a very long time, so I suggest you close the lid and leave it be. Unless you are using a very fast and powerful Mac Pro with a fast thumb drive, using a normal device took me 1 day plus. Yes, one whole fucking day.
If you encounter an error stating that there is no Restore profile found, click on “Images” option at the top menu and select “Scan Image for Restore”. After that, try again.
Step 4
Install the Chameleon boot loader
Now that the whole Mac OS X Snow Leopard is in the thumb drive, the thumb drive is not bootable. Therefore we need to install a bootloader onto the thumb drive. One of the famous options will be the Chameleon bootloader. Download the Chameleon RC 2 and start the installer. Just make sure you point the destination to be pointing to the USB thumb drive and not your local hard disk.
Once you are done with the installation, you can now hook up this thumb drive to any computer and as long as you set the computer to boot off from USB, it will load this USB Mac OS X installer.
You can use this thumb drive along side with any iboot bootable disc too. Just set to boot from CD and the thumb drive will show as a disc after the iboot has booted up.

Leave a Reply
You must be logged in to post a comment.