Dual Boot Ubuntu Win 7
Dual Boot Ubuntu and Windows 7
 Dual boot of Ubuntu and Win 7 is very useful in a lot of situations. DIY Computer Repairs shows you how to do a multi boot system the easy way without mess. Ubuntu not only functions as a file recovery backup plan since it is able to access all your important files even when Windows is totally down. You do not even need to fret over issues like permissions of folders that do not belong to you for those who tried taking out the hard drive and hooking it up as slave on another computer.
It is not too hard actually if you do it in a proper sequence. There are a few ways to get a dual boot system, this guide your show you how to install one Linux and Windows together in a single hard disk the easy way.
There is no need to panic or start installing partitioning programs and mess your hair on how big you want to split your drive. The resize-ing of the whole drive can be done inside the installation itself. I will use one of the easy ways as an example in this guide.
The first step is to install one functioning Windows operating system inside your computer. If you have not done so before, check the videos in these guides, one for XP and one for Windows 7. There is no need to worry about partitioning. Once you have one running Windows with no issues, now is the time to install Ubuntu. What I am going to teach in this guide is not about using the Wubi.exe that will install Ubuntu inside Windows like any other program. This method of installation runs Ubuntu with limited features and is not the full deal. In this article, I will use Windows 7 as the first operating system in the computer since it is more applicable this days when most computers now come pre-installed with Windows 7. It will be the same with any other Windows be it XP or Vista.
First off, download Ubuntu from the website, follow the instructions there to burn it to a bootable CD. I will use Ubuntu 10.04 Lucid as the example.
Next set the BIOS setup to boot off from CD drive as we will do for any bootable disc. You will see the Ubuntu menu. Select install Ubuntu.
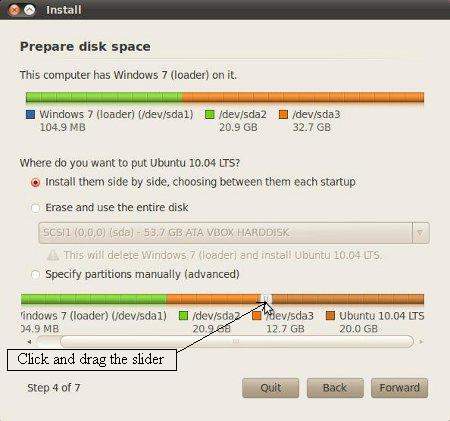
The first few pages of the installation is quite fool proof and simple. It is just the usual selecting of the language, user name and password. After going through all the basic settings, you will eventually come to a point where it asks you how you intend to set your partition. Now this is the part to take note of.
Looking at this screen, you will be quite confused as to how you are going to allocate your partition for Ubuntu and Windows. One trick that you may not know is that there is a scroll bar you can move to resize your partition.
Once you have decided on how large or small you want your Ubuntu to be, click Forward.and Continue. It will proceed to resize your partition and the next screen will be for you to key in your user name and password. Notice that right at the bottom of this page, there are 3 options.
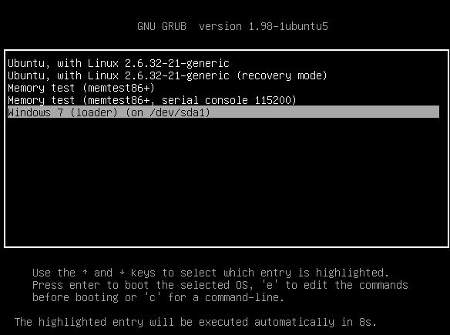
Selecting the “Log in automatically” will be more suitable if you are the only one using this computer. Else you will always have to get past a log in screen which ends up quite irritating for me. This option does not exist if you install it using the Wubi.exe that installs Ubuntu as an image and not the real deal. Once you go through to the end of the configurations, you can proceed to install Ubuntu. When you are done, you will get a new boot up menu that allows you to choose between Ubuntu and Windows.
I know that you may not like Ubuntu to be the default selection, but it is not too difficult to change it so that Windows is the default operating system to boot to.
First load into Ubuntu and install a package called the “startupmanager”. This package allows you to change various startup settings like the default operating system to the timeout before a choice is selected.
Click on System => Administration => StartUp-Manager
Change the default operating system to your preferred choice and click on “Close”. It will apply your settings and you will notice the change upon reboot.
I hope this guide on dual booting of Ubuntu and XP is easy for all users to follow.


Leave a Reply
You must be logged in to post a comment.