Install Windows 7 USB
Install Windows 7 using USB thumb drive
 Installing Windows 7 from USB thumb drive is very useful for netbooks that do not come with a disc drive. It is also very beneficial when carrying out any diy computer repairs as it is faster then trying to install from a disc.
Users who do not have a DVD drive will not need to worry about not being able to install Windows 7 or Windows Vista because the disc is a DVD. With Operating Systems getting more advanced these days, getting it to install from a USB thumb drive is a lot easier than before. Here are the steps you need to do in order to get the whole installation CD inside a thumb drive.
Format your USB thumb drive.
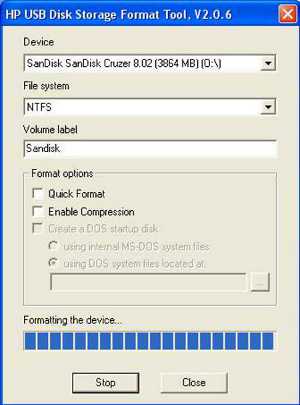
First download this HP USB storage format utility. Hook up the USB thumb drive and start the program. You will need to format the thumb drive to NTFS.
Download mbrwiz and extract it to C:\ . Place it right in the C: for easy access because you need to do Dos commands later.
Press the “Windows Key” + “R” and type “cmd”.
Make sure that the mbrwiz.exe is placed in the correct location. Type the commands in the following order.
Cd\
mbrwiz /list
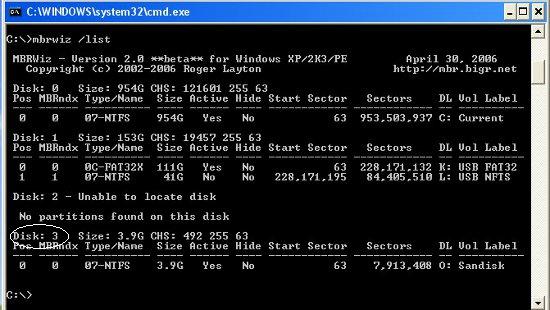 Take note of the disk number, you will need to replace the number in the next command with yours.
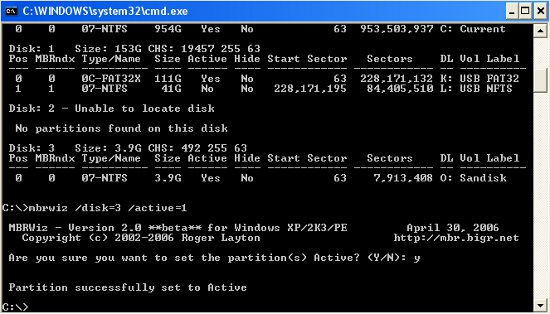
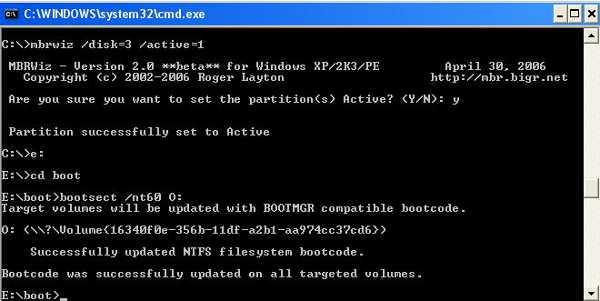
Mbrwiz /disk=3 /active=1 ( Replace the disk number with your own, but the active is set as 1)
Now you will need to transfer the boot record into the thumb drive. Type the following commands in the command prompt.
E: [ Hit enter , where E: is the location where my Windows 7 DVD is]
[If you are using an iso file instead, mount it using any CD emulator software.]
Cd boot
Bootsect /nt60 O: (O is the letter of my thumb drive)
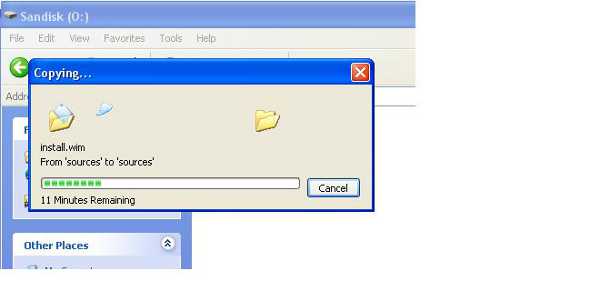
Now all you need to do it to copy the entire contents of the DVD drive to the USB thumb drive. Once everything copied over, set the bios setup to boot from USB and it should start with no issues.
I hope this guide will come in handy to many since more and more people are using netbooks these days. Install Windows 7 using a thumb drive instead of a CD is not a difficult process and the whole installation is a lot faster than using a disc. I welcome all readers of this article to input any additional information.
6 Comments Already
Leave a Reply
You must be logged in to post a comment.
This handy guide will be useful, I used to work in computer lab during college years and I used to know so many tips and tricks with computer but at my current job, does not require it, so I am losing it, this is a great place to come often and check out your DIY guide here. Thank you.
dear friend ,we can use a quick , easy and user friendly method ,where you only need one file and your window installation from usb pen drive will start,for more click here
That is a good piece of software indeed, a whole package written in English except for one odd issue the EULA is written totally in Russian. With one comment from the author that it contains bugs.
Checking their forum got me this
http://wintoflash.com/forum/viewtopic.php?f=10&t=424
Which means there is some issues with them copying correctly from the source files.
This concept looks very similar to the article here
https://www.diy-computer-repairs.com/xp-usb-install/
If you go right to the bottom of the article, you will notice the same menu to do text mode first before graphic mode. The same issue will occur as the hard disk is not given the correct allocation yet to proceed with the installation, that is why there is a need to reboot to ensure that the hard disk is given the C:
I hope the readers using that technique will be aware of that issue and also do take note that after the whole installation, the 2 menus will still be there with one showing “Repair Windows with USB” and the other to “Start Windows”.
good stuff,I was wondering whether there was a way round this so thanks for passing this one on.
This is something I’ve really wanted, just for the portability of it. After trying several different methods of getting Windows 7 installed off of a flash disk, all of them working until about 15 min into the install when Windows has trouble finding some files. The method you have listed is slightly different, I’ll have to see if this does the trick.