Partition SD Card For Android Installation

Wondering how to partition your SD card for an Android installation. Users who have been running Android operating system on their Windows Mobile phone will prefer to run their Android builds off the SD card then flashing directly onto the internal ram of the device. This is a safer approach, since nothing is perfect and if something goes wrong, you will not end up with a crashed Android phone. However running off an SD card has its disadvantages; the speed of the Android will be significantly slower and laggy .
Luckily, the android developers have a solution for computer geeks so that they can partition their SD card to contain the ext3 and swap partitions to speed up the Android operating system by a huge margin. In fact, it is said that the overall performance can be comparable to flashing it direct into the internal ram. This is a huge improvement in android development. It is not really exactly identical but pretty close. This concept will work well with any microSD card that is 2 gig or larger. If your SD card is smaller then that, it will be quite meaningless since after creating 2 partitions for swap and ext 3, you won’t have a lot of storage for the Android build. In this example, you will use your SD card as a whole. Ignore the brown “other” partition that I have created in the screen shots because in the example below, I did the partition for an SD card that was used for the Windows Phone 7 installation. Therefore, only people who want to do a dual boot between Windows Phone 7 and Android will get the outcome you see below.
Step 1
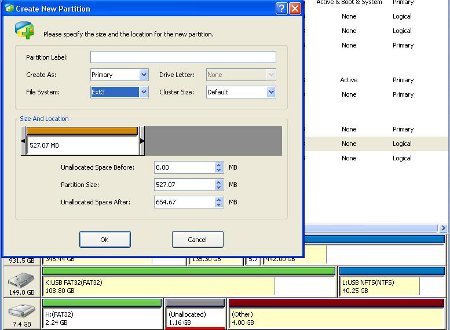
Create a Fat32 partition
According to the android developer, these partitions must be created in a fixed sequence; you cannot skip the cycle and create the other two partitions first. Assume that you have only one partition in your SD card. For some reason if you have partitions in your SD card, delete all your partitions in the SD card until the whole SD card is a single partition on it’s own. Use the partitioning free software to create a single Fat32 partition if required.
Using this partitioning free software, right click on the SD card’s partition and select “Re size”. Drag the slider to re size your partition to
your desired value. This will be your main drive where the Android and all the rest of the files will reside in.
Step 2
Create an Ext3 partition
Computer geeks who use Linux will not be unfamiliar with the Ext3 partition. But for those who are not sure what it is all about, lets just say it is something like the partition for the Android to load it’s system files for the Android build that is running. Right click on the remaining space in the SD card and create an Ext 3 partition. Choose a value that you find comfortable, depending on your size of your SD card. A good figure will be around 500 meg. But if your SD card is bigger, you can allocate a larger Ext 3.
Step 3
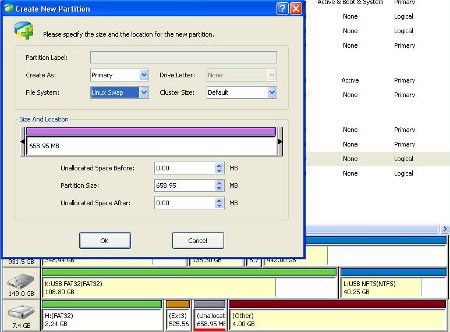
Create a Linux Swap file
The Linux Swap file is like the “virtual memory” that many Windows users will be familiar with. Android development allows the build to run off an SD but lacks the physical “rams”, this Linux Swap file partition will act as rams to speed up the overall performance of your Android build. At this point, you should have only the last bits of your SD card left, right click on the last bit of space and create a Linux Swap file partition.
Finally, click on the “Apply” icon at the top left hand and allow the system to make the necessary changes. After which you can proceed to copy the Android build of your choice onto the SD card which will now show up on your personal computer with only the Fat32 partition visible.
Try loading your Android after you have partitioned your SD card, you should be able to observe some significant improvement in performance. If your Android build is already fast to begin with, of course you will not be able to feel any difference, but builds that are slow and sluggish if you have all the widgets running will now run smoother then before.
I hope readers like this article on how to partition your SD card for an Android installation.
11 Comments Already
Leave a Reply
You must be logged in to post a comment.


DO I NEED AN rooted OS?
or the original OS will work too?
How will i know if it worked?
This concept is only applicable to devices that have Windows Mobile OS and are dual booting between Android and Windows. This concept also applies only if you are trying to run Android off an SD card. If you are holding on to an Android phone that you purchased off a shop, this is not applicable at all.
This concept is really nice.It’s use is so important in android application.
The way you explained your concept is interested and the steps you have given for understanding is amazing.Actually I don’t know much about partition SD card android installation .But after reading your blog ,I got more information about android and SD card.Thanks for finding time to share your ideas.
Hi, I know this post is slightly old but it seemed like was it the perfect solution for my phone which is originaly booted with windows 6.5 but now has a custom android 2.3.4 rom running. It is lagging in almost every way and I believe RAM shortness is the problem. I just followed your guide and my phone is slower. Any Ideas. Thanks!
Running Android via SD for a HTC depends on how stable that build is for your phone. I have only tested on a HTC HD 2. I know there are laggy builds out there to begin with and this partitioning will aid in smoothing out a certain percentage. But it is not going to do magic for builds that are already not optimized properly. If you happen to hold a HTC HD 2, I recommend this build
http://www.multiupload.com/1W761JXTF6
Simply extract the whole Android folder and copy the data.img file included into the Android folder and paste it into your SD card. Tap and let your phone do a first boot. Then set up the first inital settings. Don’t do anything.. Shut down first.
Then start the Phone and enter Android again and you can do everything you want. It is fast and smooth with no lag. Of course the initial minutes of setting up will be a little laggy.
I suggest searching for MCCM builds for your phone. They are good.
hi. i have a problem after i partitioned my sd, i moved all folders/files in my computer first before i followed the steps here. then after that moved back all my files to my sd and when i insert it to my phone it says that it’s a blank sd and need to be formatted. is it ok to format it? what should i do? thanks in advance.
This will occur if your SD card is not really big, and it is actually a older SD card that comes with the phone itself. Some cards are pre-formatted with 16 bit. You will need to use the partition software to do a single partition on the SD card and have it formatted to 32 bit once. Then split the SD card again.
very nice.easy to make it. thanks a lot.
be sure to use PRIMARY partition type for FAT and EXT
minitool is great, much better that trying paragon or something [it actually corrupted my windows install!!]
Unless you have selected the wrong partition or else it should not affect the main Windows installation at all